Why is it important to optimize images?
It has already become clear that one of the main consequences of your e-commerce not loading at an adequate speed due to the resolution and size of your images is that your visitors leave your page. And as we have said more than once, your users are not willing to wait knowing that there are other pages that can offer the same content at a higher speed. A website with a slow loading speed is synonymous with a very high bounce rate . In addition, the 3G and 4G networks that a smartphone reaches do not even come close to the broadband speed that reaches the home. Taking this into account and that more and more users access the Internet from mobile devices , it is essential not to overlook the loading speed of your store's images. But that's not all. The Internet giant also takes into account the loading speed of a website with respect to SEO positioning . As you can imagine, Google has a limited time to crawl your website. This means that the faster your store is to open, the more chances Google has of crawling a greater number of pages of your e-commerce and thus getting more chances of being among the first in its search engine. But let's start at the beginning...What quality should the images have?
As we have been telling you, images are a fundamental element for any online store. For this reason, we also want you to know what parameters you should take into account when choosing and optimizing the images for your website.Resolution
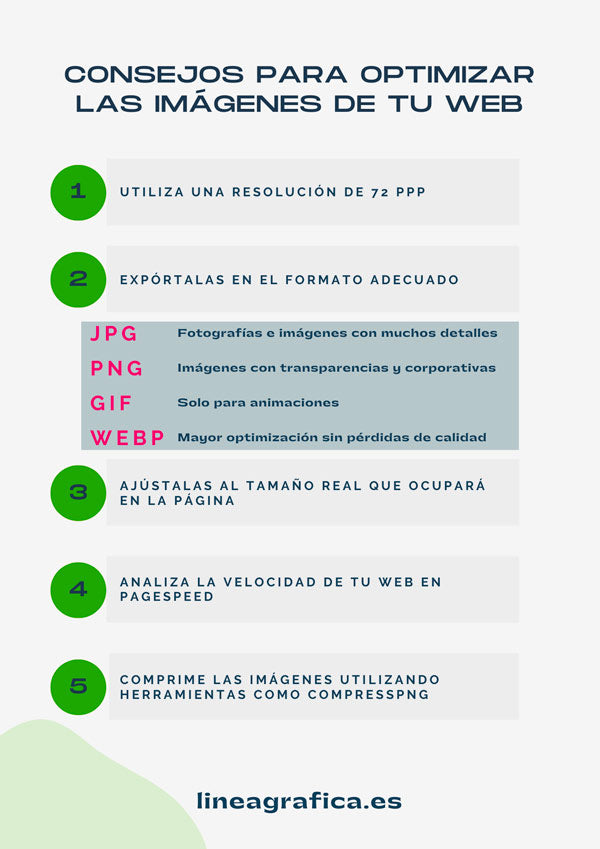
First of all, it is important to understand that saving an image for publishing on the Internet is not the same as saving an image for printing. These are two very different ways of viewing an image on very different media : on a screen and on paper. Therefore, the most important thing is to check in an image editing program (such as Photoshop, Illustrator or GIMP) that it is at a resolution of 72 dpi (pixels per inch). The higher this number, the higher the quality. To display it on a website, 72 dpi is more than enough, while to print it for a poster, for example, you would need about 300 dpi.Format
Surely when saving an image you will see several formats and you will have asked yourself questions like , which weighs more, PNG or JPG? For this reason, it is important to know what all the formats are used for, since they can be more useful when optimizing images . Behind each of them there is a world, but don't worry, we will give you the necessary information to know when to use one or the other:- JPG: This is the universal format for photographs, as it is the one that best compresses them without losing their original tone or colours. Therefore, it is great for images with a lot of detail. In addition, you can modify the quality from 0 to 100. For example, if you save at a quality of 80 you will hardly notice the difference in sharpness but you will notice the difference in the weight of the image, as it will take up approximately 30% less space.
- PNG: It preserves transparency, making it the best format for branded images such as logos or images with flat colors. Its great advantage is that it doesn't lose much quality in compression. But is there a difference between PNG 8 and 24? The difference between the two formats is that PNG 8 stores a maximum of 256 colors, while 24 increases that to 16 million colors. We recommend that you only use PNG 8 on images that don't need transparency and have few colors.
- GIF: Use this format only when your images include animation. Keep in mind that it is not compressed to good quality because animations include several frames, meaning they store more than one photo.
- WEBP: This format, developed by Google a few years ago, offers high-quality images, but with a smaller size than other formats such as PNG or PJG. Therefore, by greatly optimizing the size of the images without sacrificing their quality , it is a very suitable format for websites.
Dimensions
Normally, we tend to save the image in the default size or even a large size because we think that it will look better on our website. But you will have noticed that the quality and sharpness of your images depend fundamentally on the resolution and format in which you export them. So forget about saving your images in a large size, since they will increase in weight considerably and without any coherence if your image is going to be shown in a much smaller size on your page. Therefore, we advise you to export all the images at the actual size that they will be shown on your website, that is, with the dimensions that you use in your Prestashop . Thus, if it is going to occupy a space of 50 px x 70 px, adjust it to that size. With this you will be able to considerably reduce the weight of your photographs without losing quality or looking pixelated. Why do you want to have a larger image if your users are going to see it smaller?What size for product photos?
In Design > Image Settings within your Prestashop you can filter by products and see the size of all the product images you have in your store. So, for example, if the largest product image you have is 1000px X 1000px, you should use images of that type with the same size. If you use a smaller image in that case, it will appear pixelated. That is, you will have to adapt each image to the format or size you have established. On the other hand, in relation to the weight of said images, it is recommended that they do not weigh more than 100 KB , since otherwise the loading speed of your e-commerce will increase.
Tools to optimize images
We show you a series of good practices and tools that will make your online store load much faster. If you have already created your online store, the first thing is to check the loading speed. To do this, we recommend that you analyze it from PageSpeed . It is very simple, you just have to enter your URL, click on analyze and the results will appear, divided between diagnoses and opportunities. In addition, by clicking on the arrows on the right, you will see how these errors can be corrected .
 Now we just need to change the weight of those images and replace them, so save them to your computer. Once you have stored all of them, use some tool to compress images. We showed you Compresspng and Compressjpg , but you can use any of them since their operation is very similar and quite intuitive. First, upload your images according to the format they are in Comprespng or Compressjpg , by clicking on Upload Files . Depending on the images you upload, it will take more or less time to compress. When it finishes, download them from Download ZIP . You already have your compressed images! Now you just have to upload them to your website again.
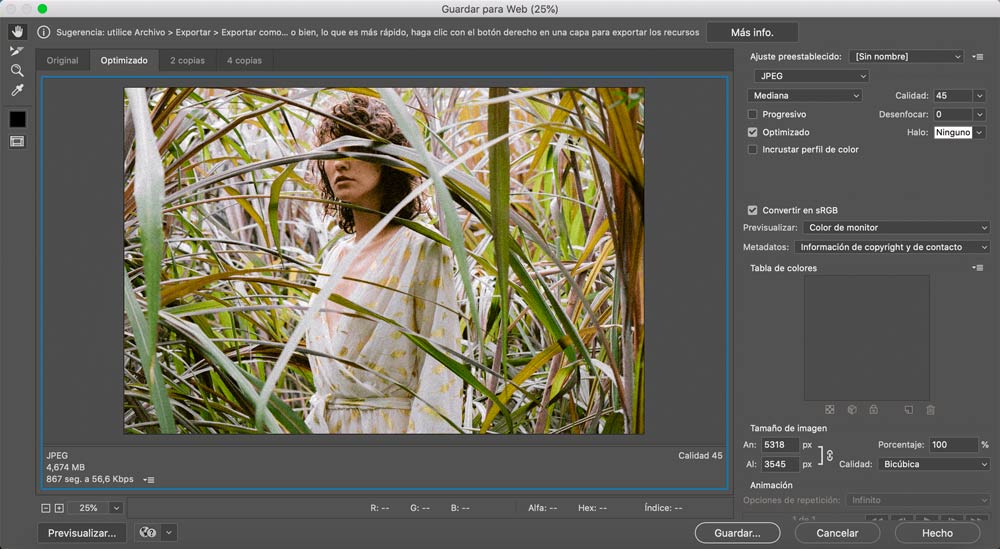
  And if you want to upload new images to your site, you just have to export them in the appropriate format and with a resolution of 72dpi from an image editing program. In Photoshop and GIMP you must save them from Save for web. A screen will appear, where you can choose the format, now you have to choose the one that best suits you according to what we have explained above. You can also check and change the resolution in Image > Image Size.
  In summary:
Module to optimize images in PrestaShop
As we mentioned at the beginning of the post, improving the loading speed is not only beneficial for the user who is calmly browsing our PrestaShop store. Google, which is always hungry for quality websites , values the time it takes to open an e-commerce so highly that, if it loads at an acceptable speed, it will appear in the top positions. And what does that mean? That if you have a wonderful online store, but your competition also has one and it loads faster, Google will position it ahead in the search results. You already know that offering comfort, transparency and security forms the basis of any digital store. You know this, of course, and we also understand the difficulties that this entails. Therefore, and with the aim of presenting all the alternatives to improve the loading speed, we propose the most comfortable and effective one. The Module to optimize images in PrestaShop signed by Línea Gráfica is the help you need to turn your PrestaShop store into a real featherweight. This module reduces the size of the images on your website without losing quality through an intuitive and very easy-to-use system:- Choose the percentage of JPG and JPEG reduction you want.
- Select the reduction value that PNG files will have.
- Select the images in your store that you don't want to be compressed. A logo, for example.

See image compressor module!
If you were looking for a quick boost to improve the speed and positioning of your website, you've found it. Checking your results in record time and offering a better experience has never been so accessible! And if after what we've said you still don't know how to improve the loading speed in PrestaShop , don't worry. We've prepared the definitive step-by-step guide!And you, do you use more tools to optimize your images? At Línea Gráfica we are experts in digital marketing and PrestaShop Platinum Partner , so if after what has been said you need help when it comes to positioning your store, you just have to contact us.


